Archive for the ‘repairing properties’ Category
Friday, December 21st, 2007
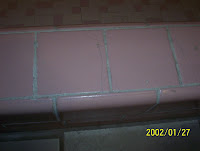
A common problem encountered in older houses is the grout can look dirty. For the 1957 fixer upper house that my wife and I are presently working on, the tile grout in the master bathroom was dingy (see picture above). My plan since I bought the house was to remove the old grout and replace it with new grout.
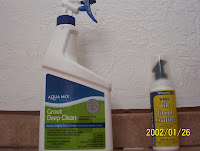
However, last week before beginning the grout removal, I checked my copy of Home Depot’s book “Tiling 1-2-3“. The book suggested cleaning the grout to bring it back to its old glory.
So I purchased some Agua Mix Grout Deep Clean, and some White Tile Grout Coating for good measure.
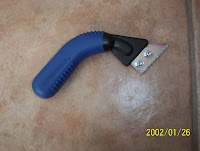
First, I used my grout saw to lightly scrape off dark spots in the grout.
Then, I used the Grout Deep Clean, which to my surprise, actually did make the grout look cleaner. I let the liquid “dwell” on the grout for 5 minutes, I “agitated” it with a scrub brush, then I waited 2 hours for it to dry. But it still wasn’t as bright as I would have liked.
Next, I liberally applied the Tile Grout Coating to the grout.
The coating did a remarkably good job of coloring the grout to a strong color of white. I was very happy with the results. After the coating dried I applied grout sealer.
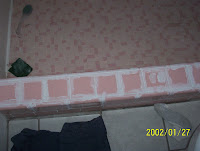
After all was done, the grout looked like this.

So, the lesson is, as long as the grout is not badly cracked, you’re better off cleaning and coating the old grout. It can save you a lot of time.
Info on Terry’s Book

 Subscribe in a reader
Share this: del.icio.us | Digg | Ma.gnolia | Reddit | Stumble Upon |
Tags:Fix em Up Rent em Out, fixing tile grout in old houses, repairing fixer upper houses, tile grout coating
Posted in fix up houses, fixer upper houses, fixer uppers, fixer-upper business, fixing rental houses, grout, grout replacement, house repair, house repairs, learn repair skills, learn to make repairs, making repairs, property damage, real estate books, rehab, rental house improvements, repair, repair books, repairing properties, repairing rental houses, repairs | 1 Comment »
Sunday, November 18th, 2007
Sunday, work continued on the fixer-upper house that we live in, and plan to sell (for more info on this investing strategy, see “How to Turn Your Home into a Rental Property, Instead of Selling It!” coming in Sept. 2012.) There was a little grouting left to do in one of the
bathrooms, around the tiles that made a baseboard-type border abound the bathroom floor.
Here are the tools I used – small bucket, white grout, a trowel, and a small “mud” (or joint compound) spatula (not pictured)
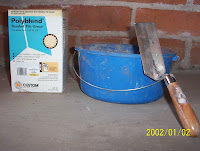
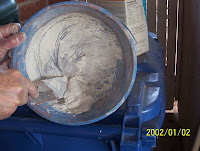
I mixed up a small amount of grout. Add water to the powder until you have grout the consistency of peanut butter.
When I mix grout, I wear a mask or kerchief to cover my mouth and nose. The grout mix contains cement, so if you breath in the powder it can scar your lungs.
I apply the grout with the small spatula.

Afterwards, I clean up tools with water.
After the grout has cured for three days, I apply grout sealer.
There are two pretty good books on floors and tiling published by Home Depot, “Tiling 1-2-3” and “Flooring 1-2-3“. I recommend “Flooring 1-2-3”, if you just want to buy one book. It cover tiles about as well as the other book, and also addresses how toinstall several other types of flooring. I used it as a guide to install both laminate flooring, and vinyl flooring.
As always, to make money in the fixer-upper business its best to do everything yourself. You learn by doing. Start small but work up to bigger projects.
Our first tiling project was in a small bathroom, a good place to learn the process. But since then, my wife and I have worked our way up to doing large bedrooms. We feel comfortable tackling any tiling project now.
Subscribe in a reader
Share this: del.icio.us | Digg | Ma.gnolia | Reddit | Stumble Upon |
Tags:books on tiling and flooring, do it yourself, fixer upper house business, grouting project in bathroom, Home Deport books, start, turn your home into a rental property
Posted in do it yourself, fixer upper houses, fixer uppers, fixer-upper business, fixing rental houses, grout, house repair, house repairs, how to turn your home into a rental property, making repairs, rental house improvements, rental houses, rental properties, rental property, rentals, repair, repair books, repairing properties, repairing rental houses, repairs, small investor, start small, Uncategorized | 2 Comments »
Friday, November 16th, 2007
 In the fixer upper rental house business, we must constantly monitor the status of our property.
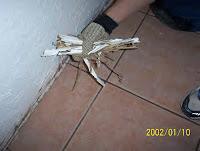
I was reminded of this again when we discovered that we had termites in one of our bedrooms. This is a fixer upper house that we are living in as we make repairs; soon to be a rental house. My son bumped his foot against the floor trim and found that there was no longer any wood trim there. All that was left was the the shell of the paint in the form of the trim. The wood had been completely eaten by termites.
Hiring a Pest Control Professional
I usually like to do all fix-up type repairs myself, but this is a case where I let the exterminators (no relation to the California governor) do the work. The first few companies I called would not give me a quote over the phone. The one company that gave me a “rough estimate” came in at a budget busting $1500 to $2,000 for a 1600 sq.ft. house. The job must be based on the square footage of the house, so it’s not rocket science to calculate the cost. It makes it impossible to compare companies if they all have to come to the house before they can give me an estimate! They think that after you invest the time to have them come over, you’ll just fall for their sales pitch, rather than spend any more time finding the best deal (and at the same time you’re concerned that your house is crumbling from the relentless termite onslaught).
So, I kept calling. After several more calls I connected with A-OK Termite and Pest Control and they really were “A-OK” because they gave me a bid of $650 without a house business. They did the job last Saturday.
Termite Living Habits

Yikes! Termites
Here in the desert southwest, we have subterranean termites, which I believe are the singlemost common type. They live in colonies deep within the ground, sometimes to depths of 25 feet. Termites work their way up through the soil from their nest and enter any wood they can. Termites can gain entrance by crawling up the sides of foundations, building mud shelter tubes to shield them from light, or they can go up hollow sections in block foundations or up cracks in the poured concrete foundations.
Every 48 hours or so termites must return to the soil to get moisture or they will die. The exterminator (again, no connection to Arnold) sets up a barrier of chemicals in the soil that the termites cannot pass through. They usually inject chlordane into the the soil every eighteen inches around the entire house. The same procedure can be done inside the house.
Even if only one part of the house is infested, the entire house must be termite-proofed or the termites will migrate to the untreated parts.
The time it takes termites to do serious damage varies from only a couple of years to 10 or more years. So, if you think you might have termites, don’t put off taking care of them too long. If it’s been 5 years since the last treatment it’s time to have the house inspected.
Subscribe in a reader
Share this: del.icio.us | Digg | Ma.gnolia | Reddit | Stumble Upon |
Tags:dealing with termites, fixer upper rental house, hiring contractors, live in fixer upper house while making repairs, making repairs, termites in rental houses
Posted in contractor calculations, contractors, do it yourself, fix up houses, fixer upper houses, fixer uppers, fixer-upper business, fixing rental houses, investment property, learn to make repairs, live in, making repairs, managing tenants, property damage, repairing properties, repairing rental houses, repairs, Uncategorized | No Comments »
Tuesday, November 13th, 2007
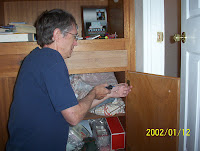
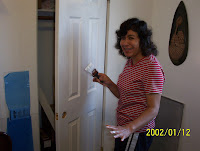
Veterans Day my wife and I, as veterans of many fixer upper house battles, refinished the hall cabinets and painted bathroom and bedroom doors.
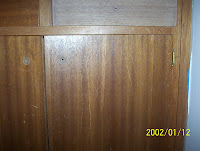
The permanent hall cabinets had been scratched up in the fixer-upper house that we are living in and repairing, to ultimately turn into a rental house .
Steps in refinishing wood cabinets:
Step 1: Take off the cabinet doors.
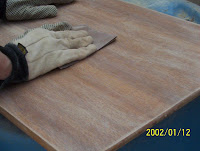
Step 2: Remove the old paint or stain. I used 150 grit sandpaper.
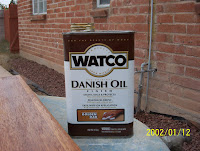
Step 3: Apply stain. I used Watco Danish Oil, which is applied with a rag and is used to both protect wood as well as to stain it. Make sure you apply test patches of your stain to an inconspicuous area of the piece to be stained. Most stains dry a shade or two darker than the color you see.
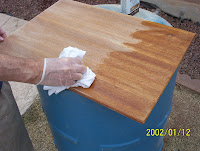
You control the color by the length of time you let the stain penetrate the wood. If it gets too dark, moisten a clothe with the recommended thinner and wipe again to dilute and wash away some of the pigment. Since this stain is oil-based, make sure you either work outside or have plenty of ventilation.
If the wood is thirsty, it may take more than one coat to get a smooth finish. Wipe in the direction of the grain.
Step 4: I’ll apply polyurethane after the last coat dries, for extra protection.
Angy expertly painting a bedroom door. She’s using Behr’s Ultra Pure White, Semi-Gloss Enamel (Wait, I’m not ready!).
For more info on converting a house to a rental, see my new book (due out September 2012) entitled “How to Turn Your Home into a Rental Property, Instead of Selling It!”
Subscribe in a reader
Share this: del.icio.us | Digg | Ma.gnolia | Reddit | Stumble Upon |
Tags:fixer upper houses, house repair, painting, refinishing cabinets, turn your home into a rental house
Posted in fixer upper houses, fixer uppers, fixer-upper business, fixing rental houses, house repairs, how to turn your home into a rental property, learn repair skills, making repairs, refinishing wood, rental house improvements, repair, repairing properties, repairing rental houses | No Comments »
Tuesday, October 23rd, 2007
Sunday was a day to continue work on our present fixer upper house.
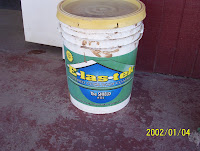
The house had a leaky cooler on the roof when we bought it. I repaired the roof with E-LAS-TEK rubberized roof coating (for flat roofs like we have in Tucson), but I had not repaired the ceiling until Sunday It had been stained by the water from the roof.
(The picture dates are wrong. I didn’t update the camera last time I changed batteries.)

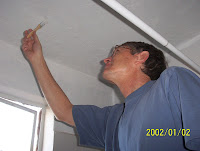
I scraped the old paint away above the bathtub. I used joint compound (“mud”) to patch the spot. After the mud dried, I brushed on “Kilz” to cover the stains and to prevent any future leaks from the roof to stain the ceiling. Later, I will paint it again with the white latex paint we are using for the bathroom.
Another project I worked on Saturday was to continue painting the house roof overhang. It could easily have been 50 years since some sections of the overhang were painted, other sections never had paint. The wood absorbs the paint like a sponge. The wood is so old that, in places, a it has a hair-like covering. Before painting, I scape off the hair (I give it a shave) with one of my “mud” spatulas. You could probably use a wire brush too, but it comes off pretty easy with the spatula.
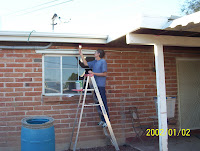
I started off using the cheap $1.00 “throw-away” brushes that you can buy at Home Depot. They didn’t hold the paint too well, so now I am using a more expensive brush which is working a little better. The paint spreads a little easier.
Most people wouldn’t notice whether or not the overhang was painted. However, we want this house to last a long time, so the paint goes on.
As I mentioned in an earlier blog, my wife & I do the repairs on this house in fits and starts. Since we live in the house, we don’t have the the pressures to do it rapidly, like we did for our last fixer-upper house. (For more info, see my latest book “How to Turn Your Home into a Rental House, Instead of Selling It).
For that one, the “Planeta” house, we worked late into the evenings and we would take turns getting up early the next morning, to put a few hours in before going to work. One of us would stay home with the sleeping kids. Making the monthly mortgage payments and all the repair costs that we were racking up, gave us real motivation to finish and get a renter in there ASAP.
In the present situation, it works best for me when I set easy short-range goals. Right now my goal is simply to get up early & paint for one hour before I eat breakfast and get ready for work. On weekends I can do more, but just an hour a day keeps the ball rolling.
Subscribe in a reader
Share this: del.icio.us | Digg | Ma.gnolia | Reddit | Stumble Upon |
Tags:ceiling repair for fixer upper, cheap paint brushes, do it yourself, e-las-tek, kilz, living in fixer upper house, painting, throw away paint brushes, turn your home into a rental house, turn your home into a rental property
Posted in do it yourself, fix up houses, fixer upper houses, fixer uppers, fixing rental houses, house repair, house repairs, how to turn your home into a rental property, learn repair skills, learn to make repairs, making repairs, painting, repairing properties, repairing rental houses, repairs, turning my home into rental property, turning your home into a rental property | No Comments »
Monday, October 15th, 2007
Repairs on the fixer-upper house that we are living in and repairing on Calle Canis continues. As mentioned previously, my wife and I bought this fixer-upper in order to live in it for at least two years and then sell it. We will pay no federal capital gains taxes for the sale because we are following the steps to receive the exception under the Taxpayer Relief Act of 1997.
There isn’t that much left to do, but often it seems like the closer we get to the end, the further away it moves from us. The list of final repairs include,
1.) refinish two permanent wooden cabinets, one in the kitchen, one in the hallway;
2.) paint new indoor doors;
3.) applying a little more mud (joint compound) to cracks in guest bathroom and paint it;
4.) finish painting outdoor trim of house;
5.) fix cracks, paint, install pump and fence in swimming pool;
6.) spray for termites (we just discovered that we have them).
Presently, I am working on the guest bathroom and my wife is painting doors. We mostly operate early in the morning while the kids are asleep.
Sometimes, when we have to focus on our rental houses, it pushes back the work on this house. But, except for a few extended breaks, we have made pretty good progress on repairing this house.
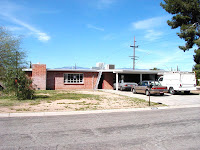
This is a 4-bedroom, 2-bath 1600 sq. ft. house that we have completed the majority of repairs on, including landscaping the front and back yard, floor tiles on bedrooms and bathrooms, new (or almost new Re-store) kitchen cabinets, wood planks in the TV room, rebuilt master bathroom, ceiling fans in all rooms, new room for the washer/dryer, fixed wall cracks, paint all walls and ceilings, and other odds and ends.
Kitchen before repairs:
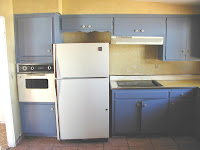
Kithecn after repairs:
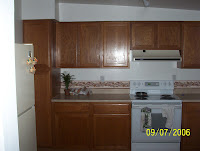
Mostly, we just fixed or replaced what was broken or missing. Since we plan to sell the house, we are spending a little more to make it look good than we would if we were going to rent it. With the weak market, I sometimes ponder keeping it as a rental until the market perks up again, but we don’t have to decide right now. As Lincoln said, ‘we’ll jump over that ditch when we get to it.”
Subscribe in a reader
Share this: del.icio.us | Digg | Ma.gnolia | Reddit | Stumble Upon |
Tags:making repairs, repairing fixer upper houses, taxpayer relief act exemption
Posted in do it yourself, fix up houses, fixer upper houses, fixer uppers, fixer-upper business, fixing rental houses, house repair, house repairs, repair, repairing properties | No Comments »
Sunday, October 7th, 2007

As fixer upper rental house business owners, its good to know how to do as many repair jobs as possible, however, when a job is too technical and beyond your abilities, or too tedious, like a large painting job, it’s time to contract the job out.
The secret in dealing with contractors is that it’s better to pay by the job instead of by the hour. If you pay by the hour, whoever you contract with can bleed you dry by working many more hours than anticipated. If you can get the contractor to set a fee before beginning the job, he absorbs the cost of working the extra hours instead of you.
This technique works well if you are hiring a non-professional, like high school students to paint outside trim work for you. However, it doesn’t always work so well if you are hiring a highly skilled electrician or plumber. Sometimes they’ll give you a set price, but mostly you pay them by the hour.
I have a highly skilled handy man I call in for jobs over my head, and I always pay him by the hour. He often will make repairs at my rental properties at odd hours and respond quickly to emergency situations. Without him, I’d almost have to quit may day job to keep up with repairs. When you have someone like that, you do whatever you have to, to hang on to them.
Subscribe in a reader
Share this: del.icio.us | Digg | Ma.gnolia | Reddit | Stumble Upon |
Tags:contracting out jobs, cutting repair costs, fixer upper rental house owners, handyman, pay by the hour not by the job
Posted in fixer upper houses, fixer uppers, fixer-upper business, fixing rental houses, house repair, house repairs, learn repair skills, learn to make repairs, making repairs, rental house improvements, rental management, repairing properties, repairing rental houses, repairs | 2 Comments »
Thursday, September 27th, 2007

Should you invest in fixer upper rental houses the old fashioned way, or try to learn it all in 2 days?
Yesterday, I received an email announcement inviting me to a real estate boot camp. It read,
The Ultimate Investor’s Bootcamp!
“You’ll Be Spoon-Fed Cutting Edge Tactics & Insider Secrets. And You’ll Walk Away Knowing Exactly How To Create Stunning Business Success & Vast Amounts of Positive Cash Flow.”
New investors must wonder, “Do I need to attend workshops like this to learn to invest in real estate?” It sounds tempting to be able to learn everything you need to know about investing in 2 days. Who wouldn’t want to take a shortcut like that?
My response is that you might learn some good techniques on investing at a bootcamp, but is it worth the money? I’ve been to free introductory presentations that say you will learn money making techniques about real estate investing, but it turns out to be a sales pitch to get you to sign up for an expensive “mentoring” program. Since the email with the above ad did not mention any price for the bootcamp, I imagine its not cheap. The important thing about bootcamps and mentoring programs is that you can spend a lot of money and only learn a little information. Worst of all, you can get roped into buying a program that sounds good, but may not be as good as it sounds.
My philosophy is more of a “do-it-yourself” approach. I like to cut corners, save money, and not take too many chances with my money. I’m the kind of guy who wears both a belt and suspenders to hold my pants up. I really like play it safe.
To get started in real estate investment, I would recommend to start by reading some of the excellent books that are available, such as “Investing in Real Estate” by Andrew McClean and Gary Eldred. I think you can learn more from reading a book like this than you can from going to expensive seminars. It provides information on many aspects of real estate that investors should know, without having a hidden agenda to get you to buy something more. I have mentioned other useful books in earlier blog postings, such as those by Jay DeCima, Bryan Wittenmyer and John Schuab.
You can also learn very useful information by taking real estate investing courses taught at local community colleges. I took one when I was just starting to invest, and it was outstanding. It was taught by a real estate agent who was an investor. The students learned all of the basics from someone who was actually investing in the same community where we would invest. I learned basic techniques that I am still using.
You learn by visiting a lot of houses and talking to owners and real estate agents. Practice calculating how much monthly payments would be for houses that you visit. Talk to other real estate investors. After you have a idea of how the process works, and when you can recognize a good deal from a bad deal, buy a low-priced fix-up house and learn to repair it as you go along. That’s what I did, and 7 years and 6 houses later I am still going strong.
Subscribe in a reader
Share this: del.icio.us | Digg | Ma.gnolia | Reddit | Stumble Upon |
Tags:do it yourself, fixer upper rental houses, real estate investing, ultimate investor's bootcamp
Posted in excellent real estate books, fixer upper house books, fixer upper houses, fixer uppers, fixer-upper business, fixing rental houses, gurus, how to start a real estate business, How to start your own house fix up and rental busines, investmet properties, learn to invest in real estate, real estate books, real estate boot camps, rental properties, rental property, rentals, renting, repair, repairing properties, repairing rental houses, repairs | 2 Comments »
Wednesday, September 26th, 2007
This of Part 2 of my reponse to a question asking, “My background is not in the building trades. How do I learn the required skills to start a business in repairing houses and renting them out?”
How to learn the appropriate skills:
3. Draw on the Past
After I got more involved in the repair work of our houses, I thought back about how my father had taught me a lot by example. I recall seeing him construct screened-in porches on various houses that we had lived in. I was too young to help out much at the time, or to appreciate what he was doing, but looking back I realize that it required a strong desire to learn the basic principals, and a sense of self-confidence to build it. He had no formal training in construction, and didn’t have reference books like I do, but he learned by observing other porches that had been built in the neighborhood.
I also have a friend who has made a career out of living frugally. He does virtually all of his own house repair and car repair work. If he gets stuck, he goes to the library and finds books to help him. It helps that he has a background in teaching vocational eduction. We have helped each other with house repair projects over the years, and he is a source of practical advice when I need help.
You too may have family members, or friends, that you can draw insight and inspiration from when it comes to making repairs.
4.Create a House Repair Library
I like to scour the fix-up book areas at used book stores for good buys. I buy a book as soon as I see it if I know that it has valuable information. In the past, I have waited to purchase the book only to return later and find that the book I had wanted was gone. The price you pay will literally be a drop in the bucket compared to the money you will save. I have books on almost every possible repair topic, including electrical wiring, plumbing, flooring, you name it. Some books that offer information on a wide variety of repairs, such as Reader’ Digest “Fix-it Yourself Manual” and Better Home and Gardens Complete Guide to Home Repair,” are also good to have. See my earlier blog for more infomation on recommended repair books.
When a book is not enough, I can usually get good advice on specific jobs at hardware stores, like Ace Hardware. And, you can sometimes get advice on difficult repairs by doing a Google search.
Subscribe in a reader
Share this: del.icio.us | Digg | Ma.gnolia | Reddit | Stumble Upon |
Tags:draw on the past, fix em up rent em out start a business, fix up books, learn how to repair rental houses
Posted in buying fixing renting rehabs, buying real estate, do it yourself, excellent real estate books, Fix em Up Rent em Out, fix up houses, fixer upper houses, fixer uppers, fixer-upper business, home buying, house buying, house repair, house repairs, how I got started in fixer uppers, how to make money renting housing, how to start a real estate business, How to start your own house fix up and rental busines, invest real estate repai and sell or rent, investing, investing book, investing financial independence, investing in real estate, investing in your spare time, investment house, investment property, learn repair skills, learn to invest in real estate, learn to make repairs, making repairs, managing tenants, real estat investing, real estate books, real estate principles, rental house protection, rental houses, rental management, rental properties, rental property, renting, repair, repair books, repairing properties, repairs, safe ways to invest in real estate, small investor, spare time | 1 Comment »
Tuesday, September 25th, 2007

I recently received a question asking, “My background is not in the building trades. How do I learn the required skills to start a business in repairing houses and renting them out?”
In terms of how to learn to repair houses, I will answer that question in two parts. The first part today, and the second half of my answer will be in a subsequent blog article.
How to learn the appropriate skills:
1. Learn by doing. When Orson Wells directed his first movie, “Citizen Kane,” he said that he felt “like a kid with a giant train set.” One nice thing about buying a fix-up house is that it’s like having giant practice house, where you can practice learning to do repairs. Since the house is already pretty well beat up, its OK if you make a few mistakes along the way. You can always go back and correct them later.
My philosophy is that the best way to learn is by doing. Granted, you have to gradually work your way up, if your are beginning near the bottom. At first you will have to hire out for most of the moderate or difficult repairs. Make sure you watch, or assist in doing, the repair when you pay someone to do it. That way you can do it, or at least do part of it, the next time you encounter the same situation.
Just last week, I had to hire someone to repair my air conditioner in a house that I am living in and fixing up at the same time. I took time off my 9-5:00 job to be on the roof with the repairman and observe what he was doing. I saw all of the tests that he performed with the multi-tester to identify what was wrong. The problem turned out to be two capacitors that were blown. If a similar problem arises in the future, I will know how to check and replace the capacitors myself.
If you have to pay someone to make a repair for you, make sure that you get your money’s worth by watching the repairman, and learning how to do it yourself.
2. Take community college classes. Most community colleges offer courses in the building trades – plumbing, electrical wiring, air conditioning and furnace repair, and woodworking. For a fairly low price, you can learn how to make repairs like a pro by taking these classes. I have taken several classes and they have been well worth the investment of time and money. Besides leaning the skills in a supervised environment, you also learn how to use the correct tools in the proper manner. As part of the program, students are required to take an 8-hour OSHA course in how to be aware of work site dangers, to do work in a safe way, and to avoid accidents. I highly recommend that anyone who does repair work take the OSHA class.
Subscribe in a reader
Share this: del.icio.us | Digg | Ma.gnolia | Reddit | Stumble Upon |
Tags:fixer upper houses, learn by doing, learn to repair houses, repairing rental houses, take classes
Posted in buying fixing renting rehabs, buying foreclosures, buying real estate, do it yourself, Fix em Up Rent em Out, fix up houses, fixer uppers, fixer-upper business, fixing rental houses, house repair, how I got started in fixer uppers, how to start a real estate business, How to start your own house fix up and rental busines, invest real estate repai and sell or rent, investing, investing financial independence, investing in real estate, investing in your spare time, investment house, investment property, investments, investmet properties, learn repair skills, learn to invest in real estate, learn to make repairs, making repairs, overcoming obstacles, real estat investing, real estate, real estate principles, rental houses, rental management, rental properties, rental property, repair, repairing properties, repairing rental houses, retirement, safe ways to invest in real estate, small investor, spare time, Terry Sprouse | 6 Comments »


