Archive for the ‘property damage’ Category
Monday, July 2nd, 2012
One of the jobs associated with operating a fixer upper and rental house business is to keep your rental properties in ship shape!
With the annual approach of summer rains, now is almost the last chance to make rental house roofs water proof before the watery onslaught. As someone who has a sworn aversion for arriving too early to parties, I subscribe to the time-tested philosophy of “better late than never.”
This morning I applied some black roofing cement on some areas on one of my townhouse roofs. I had located some cracks upon my inspection of it about 2 weeks ago.
The first photo shows the area in question, where I had previously applied a small amount of plastic roofing cement, but today I was going to put on some more and cover a broader area.

The second photo shows the application of the plastic roofing cement. We apply one layer of cement, then put a white membrane on top of that, followed by a second layer of cement. The membrane allows for more cement to be applied.

Below is the “after” photo. You can see that in addition to the corner, we hit a few other cracks with our roofing cement on the sides of theroof. Later, we’ll come back with white roofing paint to cover the black cement.

A good rental house
My wife and I purchased this 2 bed 2 bath townhouse in 1993 and lived in it for 10 years before moving on to a bigger house (to accomodate our growing family), and turning this property into a rental house in 2003.
Its been one of our best rental houses because it is in a “transition” zone (aka “opportunity zones”) where there is heavy demand for housing, and it is easy to care for because it is compact (1100 sq ft with small front and back yards). The townhouse perfect for single people or small families.
We originally purchased it for $53,000 and we charge $750/month (more if the tenants have pets).
Related Posts
Tags:fixer upper houses, fixing leaks on roofs, opportunity zones, roof repair, transition zones
Posted in Fix em Up Rent em Out, fix up houses, fixer uppers, fixer-upper business, flipping houses, house repair, house repairs, How to manage tenants, how to start a real estate business, How to start your own house fix up and rental busines, learn repair skills, learn to make repairs, making repairs, managing apartments, managing tenants, maximize rental profits, opportunity zone, property damage, purchase second home and turn current home into rental, rental house improvements, rental house protection, rental houses, rental management, rental properties, rental property, rentals, renting, repair, repair books, repairing properties, repairing rental houses, repairs, spare time, tenants, tenents, transition zone, turn my home into a rental, turn your house into a rental, turning a primary into a rental, turning an owner occupied home into an investment property, turning my home into rental property, turning your home into a rental property, Uncategorized | 15 Comments »
Saturday, January 28th, 2012

Although I used my handyman friend to inspect the first fixer upper house that I bought, in later houses I hired a professional property inspector to go through the house and to provide me with a complete inspection report.
The Value of the Inspector’s Report
The inspector’s report can be used to help you negotiate a lower price on the house if they uncover anything in the house that is in need of repair. Hiring a qualified property inspector is a good way to make sure that you are really getting what you pay for in a house.
Due Diligence Allows You to Correct Deficiencies
Once you have made an offer on a house and it had been accepted by the seller, the “due diligence” period begins and you have until the close of escrow (or completion of the sale) to check out the physical and financial condition of the property. If you discover that the property has problems, but you think the deal is still worth pursuing, the seller may be willing to correct any deficiencies, or give you money to complete the necessary work yourself.
Two Key Components of Due Diligence
There are two key components of due diligence process:
1. Review of books and records
In my case, there are usually no records to review. Most of the houses that I buy have been fixer-uppers repossessed by a bank, the Veterans Administration or HUD, and the owner is long gone.
2. The physical inspection
When there is no owner present this makes the physical inspection all the more important.
The due diligence period is your last opportunity to either:
1.) complete the transaction, or
2.) cancel the escrow, have your money returned, and look for another property.
“Carve Out Your Niche” TV Interview Monday
Tags:buying fixer upper houses, due diligence, property inspection
Posted in carve out your niche, Fix em Up Rent em Out, fix up houses, fixer upper book, fixer upper houses, fixer uppers, fixer-upper business, property damage, property inspection, property protection plan | 6 Comments »
Monday, March 3rd, 2008
‘
Following the due diligence theme, for those of us investing in fixer upper houses, we follow the outline from “Real Estate Investing for Dummies.” As a reminder, the due diligence period is the time period between the acceptance of the offer and the close of escrow. It is the time to find out if you really want the property. If its not as good as you thought, you can ask the seller for adjustments, or get out of the contract.
Pest Control
For a good pest control inspection, it’s a good idea to contract with a pest control firm and not try to do it yourself. A thorough inspection by an expert will cover much more than just infestations by wood-destroying insects. It will also document property damage by organisms that destroy wood and other building materials. This type of damage is referred to as dry rot, and they are caused by a fungus that needs moisture to multiply.
What you want, and what a good pest inspector will provide, is a diagram of the property showing the locations of damage from insects and dry rot. Sometimes these conditions require immediate attention, while others are areas to keep an eye in the future.
Serious Problems
Serious problems are those which affect the structure of house. Responses to this type or problem are:
-repair or replace the wood that has been damaged. The seller is almost always responsible to make the repairs on this type of damage. Lenders will generally not provide funds for a property until the work is completed by a licensed contractor.
Less Serious Problems
These problems do not present an immediate threat to occupants or the property, and can be dealt with at some future time. They don’t affect the structural security, but that doesn’t mean that they can be ignored indefinitely. If not addressed soon after closing, they can easily develop into serious problems that require you to address when you sell the property down the line.
Termites, a relentless foe describes an encounter that I had in a fixer-upper house with the wiley termite.
NEXT UP: ENVIRONMENTAL ISSUES
Moolanomy has an excellent post entitled Dave Ramsey’s Baby Step 6: Pay Off Home Early
Another insightful article at ezinearticles is Investment Property – Ways to Earn
Info on Terry’s Book

 Subscribe in a reader
Share this: del.icio.us | Digg | Ma.gnolia | Reddit | Stumble Upon |
Tags:dry rot, due diligence, fixer upper houses, pest control, property inspection, termites
Posted in dry rot, due diligence, fixer upper houses, fixer uppers, fixer-upper business, fixing rental houses, pest control, property damage, termites | 2 Comments »
Monday, February 11th, 2008
‘
Aimed at investors in fixer upper properties, this continuing discussion of Due Diligence from the “Real Estate Investing for Dummies” outline, turns to disclosure requirements. Due diligence is the time period between the acceptance of the offer to purchase a house and the close of escrow and completion of the sale. It is the time to get the answers to all of your questions about the house. You will never discover some of the problems that exist unless the seller tells you, which is what disclosure is all about.
The Tucson Police Example
The concept of disclosure reminds me of when the Tucson police were looking for a man they suspected of a string of burglaries. They had six photographs of the man, all taken in different locatoins and from different angles. They sent faxes of the pictures to police departments all over the country.
Three days later, Tucson received a fax from the police chief from a small town in Arizona. The report read, “We got right to work on those six pictures you sent. We’ver arrested five of the suspects, and we have the sixth under observation right now.” A classic case of a cloud of confusion caused by not enough disclosure.
Disclosure Requirements Vary
Many states have seller disclosure requirements fo residential renal property with four or fewer units. Sellers are required to supply the buyer with a written statement that identifies all known structural and mechanical problems, and in many cases, the seller must complete a comprehensive questionnaire.
However, buyers of residential investment properties with five or more units or any tyupe of commercial property usually don’t have the same protections. The idea is that buyers and sellers are more sophisticated and don’t need a formal written statement.
My opinion is that whether or not a formal disclosure statement is required, if you are the seller, it is in your best interest to disclose all problems that could affect the value or use of the house. Two reasons to fully disclose problems are: 1) morally, it is the right thing to do, and 2) the buyer could still come back and take you to court under claims of misrepresentation and fraud. Why take the chance? Once you sell a house, you want to be done with it and not have to worry about being dragged into court.
What about if a seller offers a house on a “as-is” basis? Does he or she still have to disclose problems?
The “as-is” approach to selling is the next article in this series.
How to Sell Your Home Smart
Subscribe in a reader
Share this: del.icio.us | Digg | Ma.gnolia | Reddit | Stumble Upon |
Tags:disclosure requirements, due diligence, fixer upper properties
Posted in disclosure requirement, due diligence, fixer upper houses, fixer uppers, fixer-upper business, fixing rental houses, house inspection learn a valuable lesson, house negotiating, inspecting investment properties, inspections, learn to invest in real estate, legal information, Limited Liability Companies, property damage, property inspection, property protection plan | No Comments »
Wednesday, February 6th, 2008
*
Following the outline from “Real Estate Investing for Dummies,” aimed at investors in fixer upper houses, we now move to the property inpection part of due diligence.
You have made an offer on a house, it has been accepted by the seller, and you are now in a period where you must determine whether or not the house is really worth puchasing. If you inspect the property and the physical condition is not satisfactory, almost all purchase contracts allow you to gracefully back out of the deal with no loss of earnest money.
Even if the investment property looks good on paper, and your pre-offer inspection didn’t unearth any skeletons, a wise investor will always do a thorough physical inspection before purchasing.
Although we investors tend to be frugal (see, skinflints), this is not the time to cut corners. You need an extensive inspection by qualified experts. I mentioned in an earlier post that I have a handyman/friend who has extensive experience in the construction & building trades, who inspects my investment properties. Unless you know someone that has that kind of background, you ought to hire someone who does.
Almost always, the inspection pays for itself. You will find problems in need of repair that are of far greater value than what you will pay the inspector. And the good part is, the seller will have to pay for the repairs if he wants to sell the house.
Many investors use a two-track approach to property inspection. You are looking for two types of problems:
1. Patent defects — those which are more superficial and can be spotted by merely looking at the property. These include broken doors, cracks in walls & ceilings, and spots in ceilings indicating a leaky roof.
2. Latent defects — those which are not visible to the naked eye, and are only identified through delving deep into the bowels of the house where few have treaded. In fact some potential problems, such a water pipes inbeded in the slab would be nearly impossible to evaluate. In fact, you couldn’t evaluate it at all unless you had a disclosure from the seller.
Next Time: Disclosure Requirements
Subscribe in a reader
Share this: del.icio.us | Digg | Ma.gnolia | Reddit | Stumble Upon |
Tags:due diligence, fixer upper houses, inspecting the property, property inspection
Posted in due diligence, fixer upper houses, fixer uppers, fixer-upper business, fixing rental houses, house inspection learn a valuable lesson, inspecting investment properties, inspections, learn to invest in real estate, learn to make repairs, legal information, making repairs, negotiating, overcoming obstacles, problems with closing, property damage, property inspection | No Comments »
Wednesday, January 30th, 2008
*
I am currently reading “Real Estate Investing for Dummies” by Tyson and Griswold, a well-written and thorough book that covers the basics of what real estate investors should know. I’ve long considered “Investing in Real Estate” by McLean and Eldred as one of the best introductory texts for real estate investing. Yet after reading the “Dummies” book, I find it equally as good, and perhaps a little more accessable for the new investor.
Here is my list of Top New Real Estate Books that I posted on Amazon.
To assist those who invest in fixer upper houses, I’m incorporating key parts of the “Due Diligence” chapter from the “Dummies” book with my own real estate observations.
Once you have made an offer on a house and it had been accepted by the seller, the “due diligence” period begins and you have until the close of escrow (or completion of the sale) to check out the physical and financial condition of the property. If you discover that the property has problems, but you think the deal is still worth pursuing, the seller may be willing to correct any deficiences, or give you money to to complete the necessary work yourself.
It’s during this time frame that you must get all of your questions answered and be sure you know what you are getting. If done properly, it will require quite a bit of effort on your part. But it must be done, if you wait until after the property is in your possession, its too late to ask the seller to replace that broken furnace.
You should work closely with the seller but take his word for anything. Only trust what you have in writing.
In my case, most of the house that I buy aren’t bought from the owner. They have been reposessed by a bank, the Veteran Administration or HUD. But I still do due diligence by having my friend/handyman go through house with a fine tooth comb. He knows more about the house repair than anyone I know.
There are two key components of due diligence process:
1. review of books and records
2. the physical inspection
A thorough look at these two components should allow you to determine if the property is worthwhile, priced right, and your goals. The due diligence is your last opportunity to either complete the transaction, or cancel the escrow, have your money returned, and look for another property.
Next post: Reviewing Books and Records
Subscribe in a reader
Share this: del.icio.us | Digg | Ma.gnolia | Reddit | Stumble Upon |
Tags:due diligence, physical and financial condition of the property, physical inspection, review books and records, reviewing books and records
Posted in buying fixing renting rehabs, closing, disclosure requirement, due diligence, fixer upper houses, fixer uppers, fixer-upper business, fixing rental houses, grout, home buying, home foreclosures, house buying, house inspection learn a valuable lesson, house negotiating, house repair, house repairs, inspecting investment properties, inspections, invest real estate repai and sell or rent, investmet properties, learn to invest in real estate, negotiating, overcoming obstacles, physical inspection, property damage, property inspection, purchase offer, rehab, reviewing books and records | No Comments »
Friday, December 21st, 2007
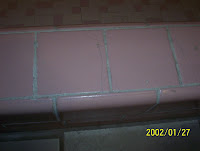
A common problem encountered in older houses is the grout can look dirty. For the 1957 fixer upper house that my wife and I are presently working on, the tile grout in the master bathroom was dingy (see picture above). My plan since I bought the house was to remove the old grout and replace it with new grout.
However, last week before beginning the grout removal, I checked my copy of Home Depot’s book “Tiling 1-2-3“. The book suggested cleaning the grout to bring it back to its old glory.
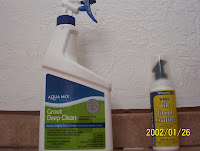
So I purchased some Agua Mix Grout Deep Clean, and some White Tile Grout Coating for good measure.
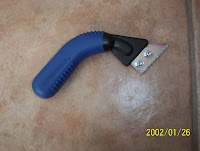
First, I used my grout saw to lightly scrape off dark spots in the grout.
Then, I used the Grout Deep Clean, which to my surprise, actually did make the grout look cleaner. I let the liquid “dwell” on the grout for 5 minutes, I “agitated” it with a scrub brush, then I waited 2 hours for it to dry. But it still wasn’t as bright as I would have liked.
Next, I liberally applied the Tile Grout Coating to the grout.
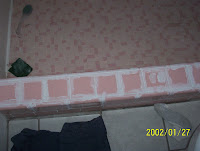
The coating did a remarkably good job of coloring the grout to a strong color of white. I was very happy with the results. After the coating dried I applied grout sealer.
After all was done, the grout looked like this.

So, the lesson is, as long as the grout is not badly cracked, you’re better off cleaning and coating the old grout. It can save you a lot of time.
Info on Terry’s Book
Subscribe in a reader
Share this: del.icio.us | Digg | Ma.gnolia | Reddit | Stumble Upon |
Tags:Fix em Up Rent em Out, fixing tile grout in old houses, repairing fixer upper houses, tile grout coating
Posted in fix up houses, fixer upper houses, fixer uppers, fixer-upper business, fixing rental houses, grout, grout replacement, house repair, house repairs, learn repair skills, learn to make repairs, making repairs, property damage, real estate books, rehab, rental house improvements, repair, repair books, repairing properties, repairing rental houses, repairs | 1 Comment »
Friday, November 16th, 2007
 In the fixer upper rental house business, we must constantly monitor the status of our property.
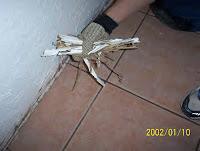
I was reminded of this again when we discovered that we had termites in one of our bedrooms. This is a fixer upper house that we are living in as we make repairs; soon to be a rental house. My son bumped his foot against the floor trim and found that there was no longer any wood trim there. All that was left was the the shell of the paint in the form of the trim. The wood had been completely eaten by termites.
Hiring a Pest Control Professional
I usually like to do all fix-up type repairs myself, but this is a case where I let the exterminators (no relation to the California governor) do the work. The first few companies I called would not give me a quote over the phone. The one company that gave me a “rough estimate” came in at a budget busting $1500 to $2,000 for a 1600 sq.ft. house. The job must be based on the square footage of the house, so it’s not rocket science to calculate the cost. It makes it impossible to compare companies if they all have to come to the house before they can give me an estimate! They think that after you invest the time to have them come over, you’ll just fall for their sales pitch, rather than spend any more time finding the best deal (and at the same time you’re concerned that your house is crumbling from the relentless termite onslaught).
So, I kept calling. After several more calls I connected with A-OK Termite and Pest Control and they really were “A-OK” because they gave me a bid of $650 without a house business. They did the job last Saturday.
Termite Living Habits

Yikes! Termites
Here in the desert southwest, we have subterranean termites, which I believe are the singlemost common type. They live in colonies deep within the ground, sometimes to depths of 25 feet. Termites work their way up through the soil from their nest and enter any wood they can. Termites can gain entrance by crawling up the sides of foundations, building mud shelter tubes to shield them from light, or they can go up hollow sections in block foundations or up cracks in the poured concrete foundations.
Every 48 hours or so termites must return to the soil to get moisture or they will die. The exterminator (again, no connection to Arnold) sets up a barrier of chemicals in the soil that the termites cannot pass through. They usually inject chlordane into the the soil every eighteen inches around the entire house. The same procedure can be done inside the house.
Even if only one part of the house is infested, the entire house must be termite-proofed or the termites will migrate to the untreated parts.
The time it takes termites to do serious damage varies from only a couple of years to 10 or more years. So, if you think you might have termites, don’t put off taking care of them too long. If it’s been 5 years since the last treatment it’s time to have the house inspected.
Subscribe in a reader
Share this: del.icio.us | Digg | Ma.gnolia | Reddit | Stumble Upon |
Tags:dealing with termites, fixer upper rental house, hiring contractors, live in fixer upper house while making repairs, making repairs, termites in rental houses
Posted in contractor calculations, contractors, do it yourself, fix up houses, fixer upper houses, fixer uppers, fixer-upper business, fixing rental houses, investment property, learn to make repairs, live in, making repairs, managing tenants, property damage, repairing properties, repairing rental houses, repairs, Uncategorized | No Comments »


