Archive for the ‘house repairs’ Category
Friday, February 13th, 2009
.
.

Here are the final numbers on the rental property that I purchased.
Price: $106,000
Interest rate: 5.125%
Term: 30 years
Down payment: $21,200
Principal & Interest: $457.37
Taxes & Insurance: $128.87
Total monthly payment: $586.24
Estimated rent: $770
The townhouse is 1100 sq.ft., 2 beds & 2 baths, washer, dryer, carport, and small back yard. It has a great central location and should rent easily. I have another property nearby that is very easy to rent.
It needs some cleanup and repair work in the kitchen, fire alarms, blinds in the windows, new toilet sets, etc. There is nothing big that we have to do to it. With my wife and kids pitching in, we should have it ready to go by the end of the weekend.
Here are a few more photos of the kitchen, the living room, and the back yard.


 Subscribe in a reader
Share this: del.icio.us | Digg | Ma.gnolia | Reddit | Stumble Upon |
Tags:Fix em Up Rent em Out, fixer upper houses, rental houses, townhouse
Posted in buying fixing renting rehabs, buying real estate, fixer uppers, fixer-upper business, fixing rental houses, house repair, house repairs, investing, investing in real estate, investing in your spare time, investment house, investment property, investments, investmet properties, learn repair skills, learn to invest in real estate, learn to make repairs, new purchase, rental house improvements, rental houses, rental properties, rental property, rentals, renting, repair, repairing properties, repairing rental houses, repairs, townhouse | 7 Comments »
Monday, September 1st, 2008
 ‘
‘
Investment House Search Update
Despite the debacle last month, my wife and I are back to beating the bushes looking for our next “dream” fixer-upper house. Our plan is to find another one that we can live in while we repair it. That has worked out pretty well on the one we are living in now.
Of course, if a great deal for a regular rental pops up, we’d probably grab that too.
Rains = Leaks
We got some heavy rain Saturday. I received a call from a tenant Saturday night. She reported three leaks in her house. I knew it was time to re-coat the roof last spring, but I thought it would hold out throught one more rainy season. I was wrong.
So, flat roofs being what they are, the roof has to be dry before it can be patched. And, there has to be no threat of rain, or the coating will just wash off again. Been there, done that.
There is a 30% chance of rain today, but for the rest of the week the forecast is 0%. Tomorrow ought to be a good day to take care of it.
Tags:dream fixer upper house, leaky roofs, roof coating, roof repairs
Posted in buy, do it yourself, fence repair, house repair, house repairs, investment house, leaks, learn repair skills, learn to make repairs, making repairs, rain, repair, repairing properties, repairing rental houses, repairs | 1 Comment »
Thursday, August 21st, 2008
Tags:fixer upper house business, home repairs, lean to make repairs, making repairs
Posted in buying fixing renting rehabs, do it yourself, Fix em Up Rent em Out, fix up houses, fixer upper houses, fixer uppers, house repair, house repairs, learn repair skills, learn to make repairs, making repairs, painting, rental property, repair, repair books, repairing properties, repairing rental houses, repairs | 3 Comments »
Wednesday, January 30th, 2008
*
I am currently reading “Real Estate Investing for Dummies” by Tyson and Griswold, a well-written and thorough book that covers the basics of what real estate investors should know. I’ve long considered “Investing in Real Estate” by McLean and Eldred as one of the best introductory texts for real estate investing. Yet after reading the “Dummies” book, I find it equally as good, and perhaps a little more accessable for the new investor.
Here is my list of Top New Real Estate Books that I posted on Amazon.
To assist those who invest in fixer upper houses, I’m incorporating key parts of the “Due Diligence” chapter from the “Dummies” book with my own real estate observations.
Once you have made an offer on a house and it had been accepted by the seller, the “due diligence” period begins and you have until the close of escrow (or completion of the sale) to check out the physical and financial condition of the property. If you discover that the property has problems, but you think the deal is still worth pursuing, the seller may be willing to correct any deficiences, or give you money to to complete the necessary work yourself.
It’s during this time frame that you must get all of your questions answered and be sure you know what you are getting. If done properly, it will require quite a bit of effort on your part. But it must be done, if you wait until after the property is in your possession, its too late to ask the seller to replace that broken furnace.
You should work closely with the seller but take his word for anything. Only trust what you have in writing.
In my case, most of the house that I buy aren’t bought from the owner. They have been reposessed by a bank, the Veteran Administration or HUD. But I still do due diligence by having my friend/handyman go through house with a fine tooth comb. He knows more about the house repair than anyone I know.
There are two key components of due diligence process:
1. review of books and records
2. the physical inspection
A thorough look at these two components should allow you to determine if the property is worthwhile, priced right, and your goals. The due diligence is your last opportunity to either complete the transaction, or cancel the escrow, have your money returned, and look for another property.
Next post: Reviewing Books and Records
Subscribe in a reader
Share this: del.icio.us | Digg | Ma.gnolia | Reddit | Stumble Upon |
Tags:due diligence, physical and financial condition of the property, physical inspection, review books and records, reviewing books and records
Posted in buying fixing renting rehabs, closing, disclosure requirement, due diligence, fixer upper houses, fixer uppers, fixer-upper business, fixing rental houses, grout, home buying, home foreclosures, house buying, house inspection learn a valuable lesson, house negotiating, house repair, house repairs, inspecting investment properties, inspections, invest real estate repai and sell or rent, investmet properties, learn to invest in real estate, negotiating, overcoming obstacles, physical inspection, property damage, property inspection, purchase offer, rehab, reviewing books and records | No Comments »
Friday, December 21st, 2007
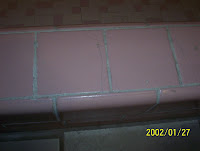
A common problem encountered in older houses is the grout can look dirty. For the 1957 fixer upper house that my wife and I are presently working on, the tile grout in the master bathroom was dingy (see picture above). My plan since I bought the house was to remove the old grout and replace it with new grout.
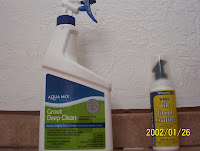
However, last week before beginning the grout removal, I checked my copy of Home Depot’s book “Tiling 1-2-3“. The book suggested cleaning the grout to bring it back to its old glory.
So I purchased some Agua Mix Grout Deep Clean, and some White Tile Grout Coating for good measure.
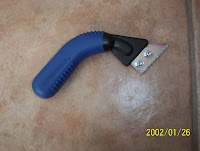
First, I used my grout saw to lightly scrape off dark spots in the grout.
Then, I used the Grout Deep Clean, which to my surprise, actually did make the grout look cleaner. I let the liquid “dwell” on the grout for 5 minutes, I “agitated” it with a scrub brush, then I waited 2 hours for it to dry. But it still wasn’t as bright as I would have liked.
Next, I liberally applied the Tile Grout Coating to the grout.
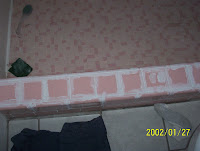
The coating did a remarkably good job of coloring the grout to a strong color of white. I was very happy with the results. After the coating dried I applied grout sealer.
After all was done, the grout looked like this.

So, the lesson is, as long as the grout is not badly cracked, you’re better off cleaning and coating the old grout. It can save you a lot of time.
Info on Terry’s Book
Subscribe in a reader
Share this: del.icio.us | Digg | Ma.gnolia | Reddit | Stumble Upon |
Tags:Fix em Up Rent em Out, fixing tile grout in old houses, repairing fixer upper houses, tile grout coating
Posted in fix up houses, fixer upper houses, fixer uppers, fixer-upper business, fixing rental houses, grout, grout replacement, house repair, house repairs, learn repair skills, learn to make repairs, making repairs, property damage, real estate books, rehab, rental house improvements, repair, repair books, repairing properties, repairing rental houses, repairs | 1 Comment »
Wednesday, November 28th, 2007
Although this can be a tricky concept it’s well worth the time spent in understanding it. As described in IRS Publication 527, Residential Rental Property, each year when you file your tax forms you can deduct the cost of repairs to a rental property, but you cannot deduct the cost of improvements. You recover the costs of your improvements when you take depreciation for your property. The difference between the two concepts is easier to grasp by looking at some examples.
Repairs
A repair, as the name implies, fixes something that is broken. It doesn’t add to the value of your property or extend its life. Examples of repairs include:
inside or outside painting
repairing gutters
fixing floors
fixing leaks
plastering
replacing broken windows
Improvements
Improvements add to the value of a house prolong its life, or adapts it to new uses. Examples of improvements include adding:
a porch, deck, patio, bedroom or bathroom
landscaping, a driveway a fence or a swimming pool
a heating system or air conditioner
a water heater, soft water system or filtration system
flooring, wall-to-wall carpeting of kitchen modernization
insulating attics walls, floor, pipes or ductwork
Improvement costs are capitalized, meaning that you recover the costs by taking depreciation over time.
Info on Terry’s Book
Subscribe in a reader
Share this: del.icio.us | Digg | Ma.gnolia | Reddit | Stumble Upon |
Posted in house repairs, rental house improvements, repairing rental houses | 2 Comments »
Sunday, November 18th, 2007
Sunday, work continued on the fixer-upper house that we live in, and plan to sell (for more info on this investing strategy, see “How to Turn Your Home into a Rental Property, Instead of Selling It!” coming in Sept. 2012.) There was a little grouting left to do in one of the
bathrooms, around the tiles that made a baseboard-type border abound the bathroom floor.
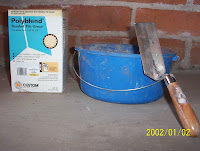
Here are the tools I used – small bucket, white grout, a trowel, and a small “mud” (or joint compound) spatula (not pictured)
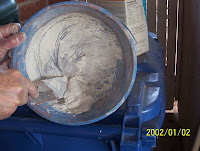
I mixed up a small amount of grout. Add water to the powder until you have grout the consistency of peanut butter.
When I mix grout, I wear a mask or kerchief to cover my mouth and nose. The grout mix contains cement, so if you breath in the powder it can scar your lungs.
I apply the grout with the small spatula.

Afterwards, I clean up tools with water.
After the grout has cured for three days, I apply grout sealer.
There are two pretty good books on floors and tiling published by Home Depot, “Tiling 1-2-3” and “Flooring 1-2-3“. I recommend “Flooring 1-2-3”, if you just want to buy one book. It cover tiles about as well as the other book, and also addresses how toinstall several other types of flooring. I used it as a guide to install both laminate flooring, and vinyl flooring.
As always, to make money in the fixer-upper business its best to do everything yourself. You learn by doing. Start small but work up to bigger projects.
Our first tiling project was in a small bathroom, a good place to learn the process. But since then, my wife and I have worked our way up to doing large bedrooms. We feel comfortable tackling any tiling project now.
Subscribe in a reader
Share this: del.icio.us | Digg | Ma.gnolia | Reddit | Stumble Upon |
Tags:books on tiling and flooring, do it yourself, fixer upper house business, grouting project in bathroom, Home Deport books, start, turn your home into a rental property
Posted in do it yourself, fixer upper houses, fixer uppers, fixer-upper business, fixing rental houses, grout, house repair, house repairs, how to turn your home into a rental property, making repairs, rental house improvements, rental houses, rental properties, rental property, rentals, repair, repair books, repairing properties, repairing rental houses, repairs, small investor, start small, Uncategorized | 2 Comments »
Tuesday, November 13th, 2007
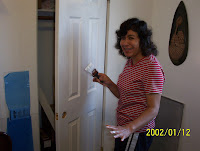
Veterans Day my wife and I, as veterans of many fixer upper house battles, refinished the hall cabinets and painted bathroom and bedroom doors.
The permanent hall cabinets had been scratched up in the fixer-upper house that we are living in and repairing, to ultimately turn into a rental house .
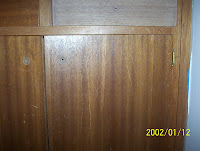
Steps in refinishing wood cabinets:
Step 1: Take off the cabinet doors.
Step 2: Remove the old paint or stain. I used 150 grit sandpaper.
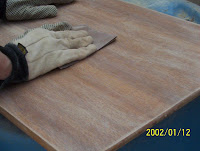
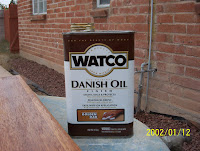
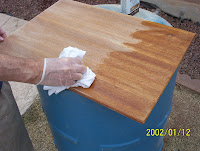
Step 3: Apply stain. I used Watco Danish Oil, which is applied with a rag and is used to both protect wood as well as to stain it. Make sure you apply test patches of your stain to an inconspicuous area of the piece to be stained. Most stains dry a shade or two darker than the color you see.
You control the color by the length of time you let the stain penetrate the wood. If it gets too dark, moisten a clothe with the recommended thinner and wipe again to dilute and wash away some of the pigment. Since this stain is oil-based, make sure you either work outside or have plenty of ventilation.
If the wood is thirsty, it may take more than one coat to get a smooth finish. Wipe in the direction of the grain.
Step 4: I’ll apply polyurethane after the last coat dries, for extra protection.
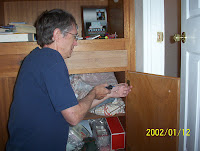
Angy expertly painting a bedroom door. She’s using Behr’s Ultra Pure White, Semi-Gloss Enamel (Wait, I’m not ready!).
For more info on converting a house to a rental, see my new book (due out September 2012) entitled “How to Turn Your Home into a Rental Property, Instead of Selling It!”
Subscribe in a reader
Share this: del.icio.us | Digg | Ma.gnolia | Reddit | Stumble Upon |
Tags:fixer upper houses, house repair, painting, refinishing cabinets, turn your home into a rental house
Posted in fixer upper houses, fixer uppers, fixer-upper business, fixing rental houses, house repairs, how to turn your home into a rental property, learn repair skills, making repairs, refinishing wood, rental house improvements, repair, repairing properties, repairing rental houses | No Comments »
Tuesday, October 23rd, 2007
Sunday was a day to continue work on our present fixer upper house.
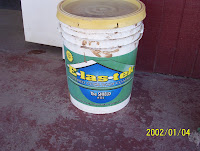
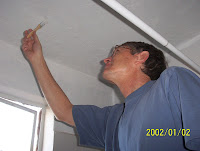
The house had a leaky cooler on the roof when we bought it. I repaired the roof with E-LAS-TEK rubberized roof coating (for flat roofs like we have in Tucson), but I had not repaired the ceiling until Sunday It had been stained by the water from the roof.
(The picture dates are wrong. I didn’t update the camera last time I changed batteries.)

I scraped the old paint away above the bathtub. I used joint compound (“mud”) to patch the spot. After the mud dried, I brushed on “Kilz” to cover the stains and to prevent any future leaks from the roof to stain the ceiling. Later, I will paint it again with the white latex paint we are using for the bathroom.
Another project I worked on Saturday was to continue painting the house roof overhang. It could easily have been 50 years since some sections of the overhang were painted, other sections never had paint. The wood absorbs the paint like a sponge. The wood is so old that, in places, a it has a hair-like covering. Before painting, I scape off the hair (I give it a shave) with one of my “mud” spatulas. You could probably use a wire brush too, but it comes off pretty easy with the spatula.
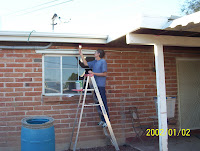
I started off using the cheap $1.00 “throw-away” brushes that you can buy at Home Depot. They didn’t hold the paint too well, so now I am using a more expensive brush which is working a little better. The paint spreads a little easier.
Most people wouldn’t notice whether or not the overhang was painted. However, we want this house to last a long time, so the paint goes on.
As I mentioned in an earlier blog, my wife & I do the repairs on this house in fits and starts. Since we live in the house, we don’t have the the pressures to do it rapidly, like we did for our last fixer-upper house. (For more info, see my latest book “How to Turn Your Home into a Rental House, Instead of Selling It).
For that one, the “Planeta” house, we worked late into the evenings and we would take turns getting up early the next morning, to put a few hours in before going to work. One of us would stay home with the sleeping kids. Making the monthly mortgage payments and all the repair costs that we were racking up, gave us real motivation to finish and get a renter in there ASAP.
In the present situation, it works best for me when I set easy short-range goals. Right now my goal is simply to get up early & paint for one hour before I eat breakfast and get ready for work. On weekends I can do more, but just an hour a day keeps the ball rolling.
Subscribe in a reader
Share this: del.icio.us | Digg | Ma.gnolia | Reddit | Stumble Upon |
Tags:ceiling repair for fixer upper, cheap paint brushes, do it yourself, e-las-tek, kilz, living in fixer upper house, painting, throw away paint brushes, turn your home into a rental house, turn your home into a rental property
Posted in do it yourself, fix up houses, fixer upper houses, fixer uppers, fixing rental houses, house repair, house repairs, how to turn your home into a rental property, learn repair skills, learn to make repairs, making repairs, painting, repairing properties, repairing rental houses, repairs, turning my home into rental property, turning your home into a rental property | No Comments »
Monday, October 15th, 2007
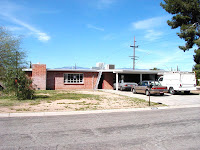
Repairs on the fixer-upper house that we are living in and repairing on Calle Canis continues. As mentioned previously, my wife and I bought this fixer-upper in order to live in it for at least two years and then sell it. We will pay no federal capital gains taxes for the sale because we are following the steps to receive the exception under the Taxpayer Relief Act of 1997.
There isn’t that much left to do, but often it seems like the closer we get to the end, the further away it moves from us. The list of final repairs include,
1.) refinish two permanent wooden cabinets, one in the kitchen, one in the hallway;
2.) paint new indoor doors;
3.) applying a little more mud (joint compound) to cracks in guest bathroom and paint it;
4.) finish painting outdoor trim of house;
5.) fix cracks, paint, install pump and fence in swimming pool;
6.) spray for termites (we just discovered that we have them).
Presently, I am working on the guest bathroom and my wife is painting doors. We mostly operate early in the morning while the kids are asleep.
Sometimes, when we have to focus on our rental houses, it pushes back the work on this house. But, except for a few extended breaks, we have made pretty good progress on repairing this house.
This is a 4-bedroom, 2-bath 1600 sq. ft. house that we have completed the majority of repairs on, including landscaping the front and back yard, floor tiles on bedrooms and bathrooms, new (or almost new Re-store) kitchen cabinets, wood planks in the TV room, rebuilt master bathroom, ceiling fans in all rooms, new room for the washer/dryer, fixed wall cracks, paint all walls and ceilings, and other odds and ends.
Kitchen before repairs:
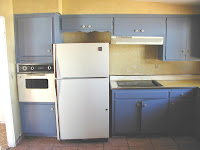
Kithecn after repairs:
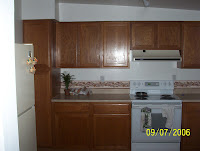
Mostly, we just fixed or replaced what was broken or missing. Since we plan to sell the house, we are spending a little more to make it look good than we would if we were going to rent it. With the weak market, I sometimes ponder keeping it as a rental until the market perks up again, but we don’t have to decide right now. As Lincoln said, ‘we’ll jump over that ditch when we get to it.”
Subscribe in a reader
Share this: del.icio.us | Digg | Ma.gnolia | Reddit | Stumble Upon |
Tags:making repairs, repairing fixer upper houses, taxpayer relief act exemption
Posted in do it yourself, fix up houses, fixer upper houses, fixer uppers, fixer-upper business, fixing rental houses, house repair, house repairs, repair, repairing properties | No Comments »


